Why are leaves turning yellow in a self watering planter?
Short answer: yellow leaves are usually caused by excess moisture, reduced oxygen to the roots, nutrient imbalance, or salt buildup. In self watering planters, constant access to water can quietly stress roots if soil, drainage, or refilling habits aren’t adjusted. The good news: most cases are fixable when caught early.
Introduction
Seeing yellow leaves is stressful. It often feels like a clear sign that something is seriously wrong — or that the plant is already dying.
But when leaves turn yellow in a self watering planter, it’s not always a disease or the end of the plant. In fact, this problem is very common in self watering systems, even for healthy plants.
Why? Because self watering planters change how roots interact with water, oxygen, and nutrients.
This guide will help you:
- understand why yellowing happens specifically in self watering planters
- tell the difference between harmless yellowing and real danger
- diagnose the exact cause step by step
- fix the problem without panic
- prevent yellow leaves from coming back
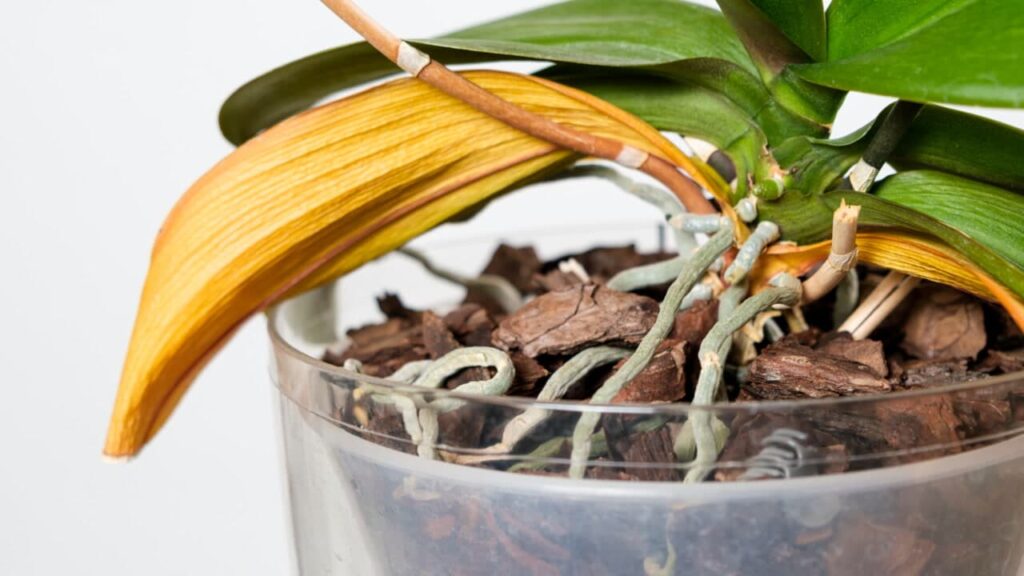
Why Are Leaves Turning Yellow in a Self Watering Planter?
Self watering planters are designed to keep soil consistently moist — but plants don’t just need water. Roots also need oxygen, balanced nutrients, and occasional dry periods.
When leaves start turning yellow in a self watering pot, it usually means one of these systems is off balance:
- water is constantly available but oxygen is limited
- nutrients aren’t reaching the plant correctly
- salts or minerals are building up
- roots are stressed or beginning to rot
This is why yellow leaves self watering planter issues often confuse plant owners: the soil doesn’t look overwatered, but the plant still behaves like it is.
Most Common Reasons Leaves Turn Yellow in Self Watering Planters
Overwatering and Constant Moisture
Yes — you can overwater plants in a self watering planter.
Even though you’re not pouring water from the top, roots may sit in soil that never dries out. This leads to:
- reduced oxygen availability
- slow root metabolism
- “wet but starving” roots
The result is often yellow leaves from overwatering in a self watering planter, especially on lower leaves.
👉 Related reading: Can You Overwater Plants in a Self Watering Planter?
Poor Drainage or Wrong Soil
Self watering systems rely heavily on soil structure.
If the soil is:
- too dense
- high in peat without aeration
- regular garden soil instead of container mix
…water moves slowly, air pockets collapse, and roots suffocate.
Symptoms include:
- evenly yellowing leaves
- slow growth
- soil that feels heavy and compacted
👉 Related reading: Best Soil for Self Watering Planters
Root Rot
Root rot is one of the more serious self watering planter yellow leaves causes, but it doesn’t happen instantly.
Early signs:
- yellowing leaves that don’t recover
- wilting despite moist soil
- a sour or swampy smell
Advanced signs:
- brown or black mushy roots
- leaves dropping rapidly
Self watering planters don’t cause root rot by default — but poor soil, constant moisture, and lack of airflow can create ideal conditions.
👉 Related reading: Do Self Watering Planters Cause Root Rot?
Nutrient Deficiency or Imbalance
Yellow leaves don’t always mean water problems.
Common deficiencies:
- Nitrogen deficiency → older leaves turn pale yellow
- Iron deficiency (chlorosis) → yellow leaves with green veins
- Magnesium deficiency → yellowing edges or patches
In self watering planters, nutrients can:
- leach unevenly
- stay locked in soggy soil
- build up in the reservoir
This is why chlorosis in a self watering planter is common even when fertilizer is used.
Salt Buildup From Fertilizer or Tap Water
White crust on the soil surface or planter rim is a red flag.
Salt buildup causes:
- chemical root stress
- blocked nutrient uptake
- leaf tip burn followed by yellowing
This often happens when:
- liquid fertilizer is added too often
- hard tap water is used continuously
- the planter is never flushed
Old Leaves vs Problem Leaves
Not all yellow leaves are a problem.
Normal yellowing:
- affects only the oldest, lowest leaves
- happens slowly
- doesn’t spread
Problem yellowing:
- spreads quickly
- affects multiple leaf levels
- comes with wilting or soft stems
Knowing the difference prevents unnecessary stress and over-fixing.
How to Tell What’s Causing Yellow Leaves
Use this quick diagnostic checklist:
Where are the yellow leaves?
- Lower leaves → water stress or nitrogen deficiency
- Upper leaves → iron deficiency or light issues
What do the leaves feel like?
- Soft and limp → overwatering
- Dry and crispy → underwatering or salt stress
How fast is it happening?
- Gradual → adjustment or mild imbalance
- Sudden → root stress or fertilizer issue
What does the soil smell like?
- Fresh → likely safe
- Sour or rotten → possible root rot
How to Fix Yellow Leaves in a Self Watering Planter
Let the Reservoir Empty
Stop refilling immediately.
Letting the reservoir run dry for a short period:
- restores oxygen to roots
- slows rot development
- allows roots to recover
This is often the fastest fix for yellow leaves in a self watering planter.
Check and Improve Soil
If soil stays wet for days:
- repot using a lighter, well-aerated mix
- add perlite, pumice, or bark
- avoid garden soil
Good soil fixes more problems than fertilizer ever will.
Flush With Clean Water
To remove salt buildup:
- Take the plant to a sink or shower
- Slowly flush soil from the top with clean water
- Let excess water drain fully
- Empty the reservoir
This reduces chemical stress almost immediately.
Adjust Fertilizer Use
Use fertilizer:
- at half strength
- less frequently
- only during active growth
Never fertilize a stressed or yellowing plant aggressively.
Inspect Roots and Trim Damage
If yellowing continues:
- gently remove the plant
- inspect roots
- trim soft, dark, or slimy sections
Healthy roots should be light-colored and firm.
Improve Airflow and Light
Low light + constant moisture = yellow leaves.
Make sure:
- the plant receives appropriate light
- air can circulate around leaves
- the planter isn’t pushed into a dark corner
When Yellow Leaves Are NOT a Serious Problem
Yellow leaves can be normal when:
- a plant adjusts after repotting
- older leaves are being shed
- seasons change
- growth slows temporarily
If new growth is green and healthy, the plant is usually fine.
How to Prevent Yellow Leaves in the Future
- Use the right soil for self watering planters
- Don’t refill on a schedule — refill based on plant response
- Periodically flush the system
- Clean the planter regularly
- Watch leaves, not just the water level
FAQ
Are yellow leaves always a sign of overwatering?
No. Yellow leaves can also indicate nutrient deficiencies, salt buildup, or natural aging.
Can underwatering cause yellow leaves in self watering planters?
Yes. If roots never reach the water reservoir, the plant can still dry out.
Should I cut off yellow leaves?
Yes — once fully yellow. Removing them helps the plant redirect energy.
How long does it take for leaves to recover?
Yellow leaves won’t turn green again, but new growth should improve within 1–3 weeks after fixing the cause.
When should I repot?
If soil stays soggy, smells bad, or roots look unhealthy, repotting is the best option.
Final reassurance
Yellow leaves in a self watering planter are a signal, not a sentence.
With the right adjustments, most plants recover quickly — and often grow stronger afterward.